˗ˏˋ Animation ˎˊ˗
Summary
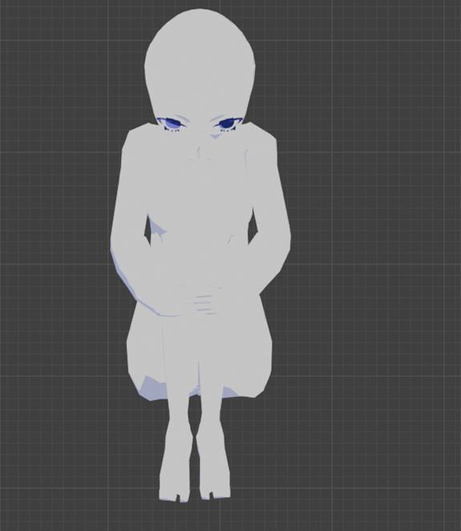
This section will be me settling on a final plan and storyboard for my final piece. I have reached this point after the influence of my research, both contextual and artist, and my experimentation. I then go on to create concept art, and model these designs to be able to use them later on for animating.
It also goes through my design, modelling and animation process in Blender: using different add-ons, modifiers, techniques, textures, and shaders. All of these have been learnt by myself through tutorials and previous experience in my Year 2 projects. It will show how I develop from sketches on paper, to end up as 3D models, which are then animated, showing difficulties and problems along the way, as well as how I have solved them or overcame other problems in the entire project. This section follows LO3, LO4, LO5, and LO7, which shows my ability to create a creative response in correlation to my theme, and what I used in order to reach this.
⠤⠤⠤⠤⠤⠤⢤⣄⣀⣀⡀⠀⠀⠀⠀⠀⠀⠀⠀⠀⠀⠀⠀⠀⠀⠀⠀⠀⠀⠀⠀⠀⠀⠀⠀⠀⠀⠀⠀⠀⠀⠀⠀⠀⠀⠀⠀⠀⠀⠀⠀⠀⠀⠀⠀⠀⠀⠀
⠀⠀⠀⠀⠀⠀⠀⠀⠀⠈⠉⠙⠒⠀⠀⠀⠀⠀⠀⠀⠀⠀⠀⠀⠀⠀⠀⠀⠀⠀⠀⠤⠤⠶⠶⠶⠦⠤⠤⠤⠤⠤⢤⣤⣀⣀⣀⣀⣀⣀⠀⠀⠀⠀⠀⠀⠀⠀
⠀⠀⠀⠀⢀⠄⢂⣠⣭⣭⣕⠄⠀⠀⠀⠀⠀⠀⠀⠀⠀⠀⠀⠀⠀⠀⠀⠀⠀⠀⠀⠀⠀⠤⠀⠀⠀⠤⠀⡀⠀⠀⠀⠀⠀⠀⠀⠀⠀⠉⠉⠉⠉⠉⠉⠉⠉⠉
⠀⠀⢀⠜⣳⣾⡿⠛⣿⣿⣿⣦⡠⠀⠀⠀⠀⠀⠀⠀⠀⠀⠀⠀⠀⠀⠀⠀⠀⠀⠀⠠⣤⣤⣤⣤⣤⣤⣤⣤⣤⣍⣀⣦⠦⠄⣀⠀⡀⠀⠀⠀⠀⠀⠀⠀⠀⠀
⠀⠠⣄⣽⣿⠋⠀⡰⢿⣿⣿⣿⣿⣦⠀⠀⠀⠀⠀⠀⠀⠀⠀⠀⠀⠀⠀⠀⠀⠀⠀⠀⣼⣿⡿⠛⠛⡿⠿⣿⣿⣿⣿⣿⣿⣷⣶⣿⣁⣂⣤⡄⠀⠀⠀⠀⠀⠀
⢳⣶⣼⣿⠃⠀⢀⠧⠤⢜⣿⣿⣿⣿⣷⠀⠀⠀⠀⠀⠀⠀⠀⠀⠀⠀⠀⠀⠀⠀⢠⣾⠟⠁⠀⠀⠀⡇⠀⣀⡈⣿⣿⣿⣿⣿⣿⣿⣿⣿⣧⡀⠁⠐⠀⣀⠀
⠀⠙⠻⣿⠀⠀⠀⠀⠀⠀⢹⣿⣿⡝⢿⡄⠀⠀⠀⠀⠀⠀⠀⠀⠀⠀⠀⠀⠀⢰⡿⠋⠀⠀⠀⠀⠠⠃⠁⠀⠀⠙⢿⣿⣿⣿⣿⣿⣿⣿⣿⣿⣶⣿⡿⠋⠀⠀
⠀⠀⠀⠙⡄⠀⠀⠀⠀⠀⢸⣿⣿⡃⢼⠁⠀⠀⠀⠀⠀⠀⠀⠀⠀⠀⠀⠀⠀⠘⠁⠀⠀⠀⠀⠀⠀⠀⠀⠀⠀⠀⠘⣿⣿⣿⣿⡏⠉⠉⠻⣿⡿⠋⠀⠀⠀⠀
⠀⠀⠀⠀⢰⠀⠀⠰⡒⠊⠻⠿⠋⠐⡼⠀⠀⠀⠀⠀⠀⠀⠀⠀⠀⠀⠀⠀⠀⠀⠀⠀⠀⠀⠀⠀⠀⠀⠀⠀⠀⠀⢠⣿⣿⣿⣿⠀⠀⠀⠀⣿⠇⠀⠀⠀⠀⠀
⠀⠀⠀⠀⠸⣇⡀⠀⠑⢄⠀⠀⠀⡠⠃⠀⠀⠀⠀⠀⠀⠀⠀⠀⠀⠀⠀⠀⠀⠀⠀⠀⠀⠀⠀⠀⠀⢖⠠⠤⠤⠔⠙⠻⠿⠋⠱⡑⢄⠀⢠⠟⠀⠀⠀⠀⠀⠀
⠀⠀⠀⠀⠀⠀⠈⠉⠒⠒⠻⠶⠛⠀⠀⠀⠀⠀⠀⠀⠀⠀⠀⠀⠀⠀⠀⠀⠀⠀⠀⠀⠀⠀⠀⠀⠀⠘⡄⠀⠀⠀⠀⠀⠀⠀⠀⠡⢀⡵⠃⠀⠀⠀⠀⠀⠀⠀
⠀⠀⠀⠀⠀⠀⠀⠀⠀⠀⠀⠀⠀⠀⠀⠀⠀⠀⠀⠀⠀⠀⠀⠀⠀⠀⠀⠀⠀⠀⠀⠀⠀⠀⠀⠀⠀⠀⠘⠦⣀⠀⠀⠀⠀⠀⢀⣤⡟⠉⠀⠀⠀⠀⠀⠀⠀⠀
⠀⠀⠀⠀⠀⠀⠀⠀⠀⠀⠀⠀⠀⠀⠀⠀⠀⠀⠀⠀⠀⠀⠀⠀⠀⠀⠀⠀⠀⠀⠀⠀⠀⠀⠀⠉⠉⠉⠉⠉⠙⠛⠓⠒⠲⠿⢍⡀⠀⠀⠀⠀⠀⠀⠀⠀⠀⠀
⠀⠀⠀⠀⠀⠀⠀⠀⠀⠀⠀⠀⣀⠄⠀⠀⠀⠀⠀⠀⠀⠀⠀⠀⠀⠀
⠀⠀⠀⠀⠀⠀⠀⠀⠀⠀⠀⣬⣾⣮⠄⠀⠀⠀⠀⠀⠀⠀⠀⠀⠀⠀
⠀⠀⠀⠀⠀⠀⠀⠀⢠⣠⣴⣿⡿⣿⣧⣤⡀⡀⠀⠀⠀⠀⠀⠀⠀⠀
⠀⠀⠀⠀⠀⠀⠀⠨⢿⡷⣾⡿⢳⠿⣿⣶⣿⢖⠀⠀⠀⠀⠀⠀⠀⠀
⠀⠀⠀⠀⠀⠀⠀⠀⠀⠀⢸⣯⣏⣿⣿⠁⠀⠀⠀⠀⠀⠀⠀⠀⠀⠀
⠀⠀⢀⣀⡄⠀⠀⠀⠀⠀⣠⣿⡼⣾⣇⡀⠀⠀⠀⠀⠀⣀⠄⠀⠀⠀
⠀⠀⣾⢿⣱⠀⠀⠀⠀⣰⣭⣿⣿⣿⣿⣇⢀⠀⠀⠀⣐⣾⣿⠀⠀⠀
⣄⣦⣿⡿⣿⠷⣾⣿⣷⡟⣷⣿⣿⣿⣷⡟⣷⣿⣷⡾⣟⠿⣿⣤⣆⠄
⠙⠻⠿⣿⣏⣿⣷⠿⢿⢟⡏⣿⣿⣿⣟⣿⢟⡿⠷⣿⣻⣿⡿⠿⠋⠈
⠀⠀⠀⠩⢻⣿⡄⠀⠀⠈⠻⣼⣿⣿⡸⠋⠁⠀⠀⢸⡿⡓⠁⠀⠀⠀
⠀⠀⠀⠀⠀⠙⠀⠀⠀⠀⠀⢿⣿⣿⠃⠀⠀⠀⠀⠘⠉⠀⠀⠀⠀⠀
⠀⠀⠀⠀⠀⠀⠀⠀⠀⠀⠀⣺⣿⣿⡆⠀⠀⠀⠀⠀⠀⠀⠀⠀⠀⠀
⠀⠀⠀⠀⠀⠀⠀⠀⠀⠀⠀⣹⣿⣿⡇⠀⠀⠀⠀⠀⠀⠀⠀⠀⠀⠀
⠀⠀⠀⠀⠀⠀⠀⠀⠀⠀⠀⢹⣿⣿⠇⠀⠀⠀⠀⠀⠀⠀⠀⠀⠀⠀
⠀⠀⠀⠀⠀⠀⠀⠀⠀⠀⠀⣽⣿⣿⣀⠀⠀⠀⠀⠀⠀⠀⠀⠀⠀⠀
⠀⠀⠀⠀⠀⠀⠀⠀⠀⠀⢠⣿⢷⢿⣧⠀⠀⠀⠀⠀⠀⠀⠀⠀⠀⠀
⠀⠀⠀⠀⠀⠀⠀⠀⠀⢠⣿⣿⠋⢟⣿⣇⠀⠀⠀⠀⠀⠀⠀⠀⠀⠀
⠀⠀⠀⠀⠀⠀⠀⠀⣀⣿⣿⣫⣆⣮⣛⣿⡅⡀⠀⠀⠀⠀⠀⠀⠀⠀
⠀⠀⠀⠀⠀⠀⠀⠸⠿⣿⣿⣿⡄⣿⣿⣿⠿⠮⠆⠀⠀⠀⠀⠀⠀⠀
⠀⠀⠀⠀⠀⠀⠀⠀⠀⠸⢿⣽⣝⣽⣽⡿⠀⠀⠀⠀⠀⠀⠀⠀⠀⠀
⠀⠀⠀⠀⠀⠀⠀⠀⠀⠀⠙⢻⣿⣿⠛⠁⠀⠀⠀⠀⠀⠀⠀⠀⠀⠀
⠀⠀⠀⠀⠀⠀⠀⠀⠀⠀⠀⠀⠈⠁⠀⠀⠀⠀⠀⠀⠀⠀⠀⠀⠀⠀
⠀⠀⠀⠀⠀⠀⠀⠀⠀⠀⠀⠀⢀⣤⣶⣶⠿⠿⠿⣶⣦⣀⠀⠀⠀
⠀⠀⠀⠀⠀⠀⠀⠀⠀⠀⣠⡾⠛⠉⠀⠀⠀⠀⠀⠀⠉⠻⣧⡀⠀
⢠⣄⣀⣀⣀⣀⣀⣀⣀⣴⠋⠀⠀⠀⠀⠀⣴⣆⠀⠀⠀⠀⠘⣿⡀
⠀⠙⠻⣿⣟⠛⠛⠛⠋⠁⠀⠀⠀⠀⠀⠘⠿⠋⠀⠀⠀⠀⠀⣿⡇
⠀⠀⠀⠀⠙⢷⣦⡀⠀⠀⠀⠀⠀⠀⠀⠀⠀⠀⠀⠀⠀⠀⠀⣾⡇
⠀⠀⠀⠀⠀⠀⠘⣿⠀⠀⠀⠀⠀⠀⠀⠀⠀⠀⠀⠀⠀⠀⠀⣽⠃
⠀⠀⠀⠀⠀⠀⢰⡿⠀⠀⠀⠀⠀⠀⠀⠀⠀⠀⠀⠀⠀⠀⠀⣿⠀
⠀⠀⠀⠀⠀⠀⣾⠃⠀⠀⠀⠀⠀⠀⠀⠀⠀⠀⠀⠀⠀⠀⢰⡿⠀
⠀⠀⠀⠀⠀⢸⡟⠀⠀⠀⠀⠀⠀⠀⠀⠀⠀⠀⠀⠀⠀⠀⣸⠃⠀
⠀⠀⠀⠀⢀⡿⠁⠀⠀⠀⠀⠀⠀⠀⠀⠀⠀⠀⠀⠀⠀⢠⡟⠀⠀
⠀⠀⠀⠀⣾⠇⠀⠀⠀⠀⠀⠀⠀⠀⠀⠀⠀⠀⠀⠀⠀⣼⠇⠀⠀
Rigging
This was the part that I was dreading the most, however I knew that I needed to get it done. I needed to push myself out of my comfort zone. The only time I had tried rigging was in 3dsMax, which didn't include rigging proper models, and I used it more so for posing the actual rig itself. To made sure that rigging went as smoothly as possible, I consistently plugged in my models as I made them into Mixamo, checking to see if any major errors would occur. This made sure I was aware of any issues I needed to fix at the time of making my models, and what to look out for when I start rigging, e.g. how the shoulders and armpits fold.
This might be a bit confusing, but as I mentioned briefly I had some troubles with the way I had done my outlines for the models and how it interacted with the rigs. I will explain everything chronologically and as best as I can without it being too confusing.
Setting Up
Instead of setting up each bone individually, I decided to use Rigify which is an extension for Blender. This includes some pre-sets for humans and some animals. There are 2 different ones for human bodies: Human, and Basic Human. The difference in these is the lack of a facial rig. I had to decide which one was going to be most useful to me. The basic rig meant I wouldn't have any facial movement therefore being a bit bland and emotionless. However, the facial rig would be more difficult as someone who hasn't rigged much before. In the end, I wanted to push myself with this project so I chose to use the regular human base rig.
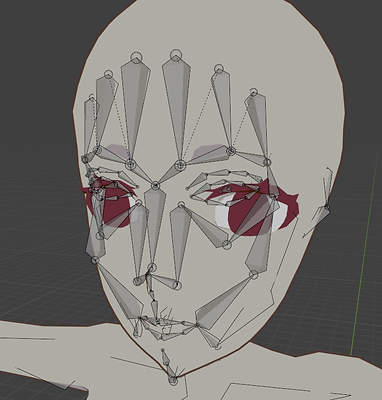
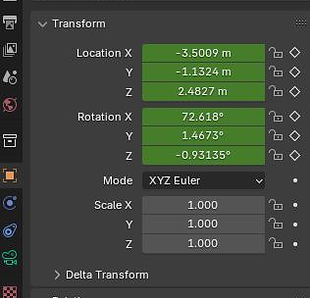
Aligning the Rig
I watched a video to help me with this, but I aligned the majority of it by focusing on the names of each bone. When moving bones around I had to be very careful. Some bones can be disconnected even though they're actually meant to be attached which lead me to fail my first rigging attempt as I had disconnected some bones in the spine. This annoyed me a lot as I had spent a while arranging the face bones as accurately as possible, which is a bit more difficult due to my character being stylised. I then retried aligning with keeping this in mind, box selecting when needed so that bones didn't separate. I also had an image of my previous facial rig to reference when recreating the rig which made it a lot easier instead of having to look up where each bone goes constantly. I took the first rig placement as practice instead of looking at it in a negative light as it helped me quite a bit. I also applied the bones for my wolf model by using the base wolf rig and placing them into the correct places. This was easier to do, but I got really frustrated when I kept testing the rig as I was going because things were shifting out of place. They weren't that noticeable so I just kept going.


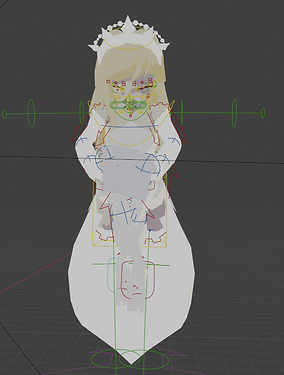
Because I was going to use the human rig for both versions of my main character I based the rig on the body model instead of the entire model. This made sure I could align bones properly where they were meant to be instead of struggling to imagine where to place them with the clothes on.
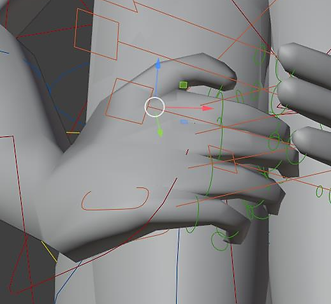
Applying the Rig & Weight Painting
This is where everything just went downhill, and it was all because of the outline I had made for my characters. The style I was initially going for was inspired by anime, therefore it would need some kind of outline. However, this ended up backfiring because of the method I had used. Whenever I would move certain limbs on the main character things would shift around, and the wolf was even worse because no matter what I moved something bad would occur whether this was the teeth completely moving somewhere else or the outline not moving fully with the model. If I didn't apply the solidify this issue would've been much easier to fix, but because I did apply it I chose to just ignore it until I broke down because of how frustrated I was. This probably seemed like I was overreacting to others, but I had poured so much work and time into these models just for them to end up not working for animation which was my plan from early on into my project. I was really upset, and felt like giving up. I gave myself some options:
- Manually remove the applied solidify, which consisted of going into edit mode and removing each face individually meaning it would take a long while.
- Switch to a story-book type final piece, which just meant I made single renders for each scene trying to hide the issues that were happening.
- Stick with the current version even if I am not happy with it.
I'm quite stubborn when it comes to these things which I am not very proud of, and would like to fix. Instead of compromising, I needed this to go the way I had originally planned. My final resort was unfortunately re-rigging everything, this wasn't ideal due to the fact I only had 5 weeks left, but it was necessary if I wanted to be motivated to work or even be happy with what I had created. It only took a day which was much shorter than I had expected, but this was probably due to multiple factors. I had found an old save file with my models before I had given them outlines, copied my old rigs and applied them onto these models which meant all I would have to do is re-do the weight painting, again this wasn't ideal but I had to do what I had to do. The weight painting was pretty simple, just an annoying task because of how tedious it is. The main problems that I fixed with this were the shoes moving around weirdly, the fur of the wolf hat morphing when hands would move, and the teeth of the wolf.
I still ran into some issue despite having no outline. There were 2 things I had to remove from my model: the tassels on the armour plates, and the ropes on the belt. These were small details, but they didn't matter much in the long run. I am sad I had to get rid of them, but it would save me a lot of stress and help me just get my work done instead of worrying about smaller details. There were no issues with the V2 model which I'm happy about, and auto weight painting worked really well for it.


Scene 1 + 2
From this point onward begins the sequence of the main character's life on earth, I am lumping these 2 scenes together as they are the same animation just split into 2 different camera angles. I used the forest environment I had created previously for these 2 scenes. For these, I wanted to show to the audience that the story has now transported to earth, and to show this I had a birds-eye view angle to sort of mimic a heavenly being watching over her, but also to use some interesting angles in my final piece otherwise it would just get boring.
To start this off, I had to create 2 walking cycles: 1 for the main character and another for the wolves. This was the first time I had animated properly with rigs so I didn't know what to expect. With the help of reference images and videos of wolves walking I managed to finish both of these. I started with the wolf walking cycle but struggled because I couldn't show the weight of the walking properly. I thought that if I made the leg movements that it would look fine, but later spoke to my teacher and realised I needed to move some other parts of the body to show this too, for example moving the shoulder bones in sync with the legs. It doesn't look perfect and there is definitely room for improvement, but for my first proper rigged animation I am happy with it.
Original Walk Cycle
Fixed Walk Cycle


I then applied this knowledge to the walk cycle for my main character, this time trying to pay attention to the weight of the feet as well as how the arms move. I had to make the fingers curve inwards a little to show how relaxed hands tend to look like, and try to mimic the arm swaying movement when a human walks. She still looks a bit tense, but this the best I could possibly get with the time limit I had.


Creating the actual scene was simple because I had done the walking animations beforehand, all I really needed to do was move the entire rig itself a suitable distance so it didn't look like they were going too slow or too fast because then it just makes them look like they're sliding across the ground. I forgot to make the feathers part of the rig so ended up having to place them in and animate them separately which was a pain and doesn't look very professional, but this was a last resort as I wanted the rest of the story to make sense and not make it seem like she had gotten arrows out of nowhere. I arranged the wolves in various angles and spaces apart from the main character just for variation and delayed some of their walking so that it wasn't all the exact same as this would look really unnatural. I also had two wolves interacting subtly, and made one wolf sit way ahead of the others to make it more interesting and show some personality, making it look as if it were about to pounce to make it look more playful and show that the dynamic between the character and the wolves is family-like. I also gave them mouth movements as I will add barking noises later on. I regret not doing snow in particles as I wouldn't have to worry about the editing as much, but I had already started to render before I realised.


Scene 3, 4, + 5
These 2 scenes were pretty much connected so I will also speak about them in 1 section. In order to show that she has committed something bad, I did the first thing that would come to someone's mind: killing another person. First I positioned the hunters in a way that looks like they are resting and talking to one another, trying to make it look as natural as possible. This was easy to do since I didn't have to worry about any objects clipping with each other or how the textures would look. Animating these 2 was simple, all I had to do with animate their heads turning as the arrow shoots towards them. Because I don't want my animation to be gruesome, I decided to leave the actual part where the hunter dies as a black screen, which meant I just had to animate their reaction before the death occurs.
After doing this, I had to animate the MC shooting her arrow which was probably the most complex pose I have done with a character. I tried to make the position of how she held the bow and arrow as accurate as possible by referencing some images. This included paying attention to small things like how the fingers were placed, the angles of the arms, the tilt of the head etc. I also wish I had planned the pose beforehand and modelled the bow based off of the pose and some parts were off in scale, more specifically how wide it was. Because of the thickness, the way her hands wrapped around the bow looked really weird, especially the thumb. I didn't have any time to mess around with it so I just had to leave it as it was, the angle it was at made sure the issue wasn't too visible anyway.
To animate the arrow I keyframed 2 positions and then adjusted them as needed. I then realised that even though my arrow is going fast, it goes slow, then fast, then slow again. This isn't what I wanted at all since it isn't how arrows would work in real life. To fix this, I had to go into the curve editor and mess around with the curves. I settled on the basic linear curve as this meant the movement wouldn't be stunted anywhere. The bow string was a bit harder, I was going to do shape keys but I didn't have enough time to figure them out. Instead, my teacher suggested to use a simple rig so that I could move the string easily. Although I didn't do the rig properly, it still worked and did its job regardless if it was badly. Again, the angle that it was visible from made sure it wasn't that obvious that I had issues with it.
I also wanted to experiment with facial expressions, it wouldn't make much sense if I didn't since I went through all that trouble to make the face rig. This part was quite fun and I enjoyed playing around with it, I gave her a subtle smirk, and made her narrow her eyes as she focuses on her target. This will show that she is quite skilled in using her bow, and this isn't her first time doing so.
I also animated a short scene afterwards of her staring into the distance after killing the hunter. I had planned to make her turn towards the camera, but after some thinking realised I should probably leave her as still as possible to show power instead of vulnerability. To animate the hair, I simply rotated each part in 5 degree increments.


Scene 7
For this scene I wanted to show a simple part of their lives. I decided to show this through them drinking some water from a small lake. The pose for the main character was a bit annoying to do as the details move out of place when doing more complex poses like these. I made her kneel on the ground, cup her hands for water, and lift it towards her mouth. I didn't do this fully as I was scared the model would mess up with so much distortion already happening. To make sure the hands were in the correct position I would consistently look back at my own, posing them as needed to get it accurate.
For the wolves I made them each do a couple different actions. 2 of the wolves are seen more into the background grooming themselves, I did animate the tongue flicking to make it more obvious but I don't think you can see it that well from where the camera is. Even so, it was good practice. I ran into a few issues when animating because I duplicate the wolves instead of importing each one, so whenever I would keyframe one movement and go to the next it would end back up in the same place as the one I duplicated which was irritating. I managed to fix this by deleting all the keyframes on the duplicated version a couple time until it fixed itself. Another wolf is drinking from the lake, this is a similar animation to the grooming one except the body is standing up and arched towards the water. I made the last wolf stretch and lay down next to the main character whilst wagging its tail. All of these animations were meant to be natural looking, I wanted to show how close they were to each other by them just chilling and doing their own things together.
For the water, I animated it by using the ocean modifier and duplicating it twice to overlap, making their wave animations slightly different to end up with the final look. I did have to edit some curves as I had the same issue with the arrow slowing down at the start and end, but it was an easy fix this time. It is quite fast even though the wind isn't showing in other places, I'm not sure if I can fix this as I don't want it to be too choppy in the final animation.


Scene 8
The animation switches up to the scene where the main character dies, by the hands of the hunter who survived. This is one of the most important scenes in the entire animation so I had to put a lot of detail into it. First, I made the running cycle for the wolves that I could reuse. I used the same method as I did for the walking cycle, by taking pictures of real life wolf videos to then keyframe into an animation cycle. I had made the walking cycle earlier, so I now had more experience and could do this one faster, whilst also considering the weight of the wolf that I didn't do much before. I think this cycle is better than my walking one because of this. I placed them in random places and made them run at different paces, times, and speeds. This made it look more natural than what I did for the first 2 scenes where they all walked in sync.
I then had to animate the gun. I used a gun for this scene to again show that we are in a modern timeline, and also to show to the viewer that this is a hunter, making them link this scene back to when she had killed one. It isn't obvious that it is the hunter from before, but I think the link can be made after realising what is happening. I didn't have to do anything that complicated for this as the hands aren't seen. I animated the gun along with the camera movements as parenting wasn't working for some reason. I tried to mimic how a hunter would look out for prey, with fast movements to anything that is moving, looking out for the slowest animal. I did make the hunter try to shoot a wolf but made it fail, again showing that the hunter is looking for the slowest one. This was taken from the fact that wolves also prey on the slowest or sickest of their prey for easier food. It then focuses on what seems like a wolf peeking its head out of a tree, but as soon as the gun shoots the main character head pops out, killing her. I gave her a shocked expression but didn't make it too obvious as she wouldn't have seen a gun before.
The bullet animation is a bit messed up as it moves to the left for some reason, but it isn't obvious when sped up which I will do when compositing the animation. I need to make it faster regardless as it is too slow to be the speed of a gunshot.


Text Scenes
As this is where the heaven sequence starts, I had made several small scenes of text to show the heavenly being talking. Because they are in between almost each scene, I will touch on this now. I was inspired by the text scenes in OMORI as they are raw and emotional. I wrote each phrase out by hand 3 times, and put them together to create short animated texts in between the scenes.
These are quite simple, but also show what the being is saying without there being a voice over. I don't think a voiceover would've worked as well, it should be left up to interpretation of how the being sounds. This also makes it easier for any viewers who don't have audio for whatever reason to understand what is happening, this will be useful especially for my end of year show.

Scene 9
This scene is split into 2 parts where the camera is at different angles, but the animation remains the exact same. It was simple to make in terms of animating as there wasn't any complicated movements going on. I made a simple "case" for her that is inspired by the jewellery brand I had researched earlier on. Because the shader on this was meant to simulate a anime-style metal texture, I had to include a bunch of lights facing in all different directions to show this when the case moves around.
Initially, I was going to animate the case going down but this looked weird and like there wasn't much movement going on. Instead, I rotated both the camera and the case at the same time which made the fact that it was moving down more obvious due to the background moving much faster.
For the pose, I made her be in a kind of foetus position, showing rebirth. She is also bobbing up and down slightly which wasn't intentional but I really liked how it looked so I kept it as it is. I did struggle with her eyes, and this is something that I will have to be more focused on the next time I do face rigging. The eyelashes and eyes were moving really weirdly when I tried to make her close her eyes. To fix this, I removed her irises, coloured the whites of her eyes the same as her skin, and tried to move around the eyelashes as best as I could. They look quite bad, and I'm not very happy with them, but they had to do as I didn't have much time to work on them.


Scene 10
With her eyes still closed, she lands on a floating platform. I was originally going to make the case shatter upon impact with the platform, but changed my mind later on when I had another idea. Instead, I made the case fade away when it touches the platform. This did require a lot of messing around and a fairly big node tree, but I managed to get it working in the way I wanted to. I was a bit scared it wouldn't turn out well because of using 2 shaders at once, but I am very happy with the final result.
As the case disappears, I also made her stand. This was meant to look effortless and smooth, as if she was floating and landing back down. It looks a little stiff, but other than that I think it is okay. I had also made a short scene of the main character looking up at the heavenly being but I ended up scrapping this because of the issue with the eyelids opening and closing.


Scene 11
This scene was another chance for me to improve movements in terms of walking for human rigs. When she steps off of the platform, these small rings appear under her feet to keep her afloat. To make these look more bouncy I had a slight delay between each of them reaching their final spot.
To make the movements look more natural, I moved the hips along when it was time for the foot to move forward. This wouldn't work very well if the entire body was in frame, but it made me realise how important showing the weight of the steps is. I'm also glad that it doesn't look like the main character is sliding around like it did in the first scenes.
There isn't much else to say about this scene as it is really simple and just some walking, but I like how it turned out, and it shows my progression in working with rigs through such a short amount of time. If I wasn't on a time constraint, I would probably go back and redo my original walk cycle.


Scene 12, 13, + 14
These scenes had to show the power and size of the heavenly being. I posed it in a similar pose to the one the main character had in her shell, except this time, the character was looking up. This way of looking through the eyebrows makes the being look more intimidating and powerful. I also had to put more focus on the way the hands wrap around the legs as the main character had fabric covering her hands making it not needed to do so. I had to move the legs in a way to hide the crotch area as when the model sits it distorts strangely and makes everything pointy for some reason. The hair was animated in the same way as I had done for the main character in scene 5, this one has a few gaps but I think it is passable.
To make animating the wigs as easy as possible I did 2 things. The first thing I did was group each wing into its own collection so that I could select all the feathers and move them at once. I did try to join all of them together as one object, but the texture messes up and applies it all as one plane which lacks depth. The second things I did was changing the origin for the wings. I did this by selecting all the feathers for one wing, setting the cursor to the inner edge of the wing, and applying origin to cursor. This meant that when I rotated the wings they would move around like actual wings, when I tried to animate them before doing this they moved weirdly, I realised this was due to the fact that the place where the wings would come out of the body moved as the wings flapped, which makes no sense. I'm glad I managed to fix this and make it look better as the other version didn't look right at all.
I made the wings spread out from the middle which made the being look even more impressive in scale. I moved the camera to face the beings face for a couple of seconds for more variety in composition.
The final scene is pretty simple, the only animation that I needed was the heavenly being caressing the main characters head. This was simple to do now that I have had experience in using rigs, but is probably something that I would've freaking out thinking about doing in the past, so I've come quite a long way. I tried to show the size of the being more accurately in this scene as I couldn't do it properly before, however this did require the main character being more to the left rather than the centre.


Compositing
Compositing was pretty easy and didn't require anything complicated as I already liked the way things looked visually, all I really needed to add was some sound effects and text. I have used after effects in the past, but only to put together animations. This was when I decided that I should rearrange the order of the scenes to make it more coherent. Someone in my class took a look at my storyboard and said that I should place all of the afterlife scenes at the end so that it makes more sense. I do agree with this, however it might be harder for people to stay concentrated and interested in the story. A few seconds on she does die though which makes up for the missing mystery that I was going to have.
The sound effects were taken from a free sound effect website, I layered some to make it more unique. I didn't have to make any music for the heavenly sequence as I had put some angelic choir sounds and it pretty much sounds like music already. The music was fairly easy to make, I used bandlab and had some help as it was my first time using it, but the end result conveys the emotion that I wanted it to.
I added a few effects like lens flare and vignette to some scenes just to add more depth and to practice more with the program. To render it, I used Adobe Media Encoder as this was the program recommended to me instead of using the in-app After Effects renderer.


