˗ˏˋ Experimentation ˎˊ˗
⠤⠤⠤⠤⠤⠤⢤⣄⣀⣀⡀⠀⠀⠀⠀⠀⠀⠀⠀⠀⠀⠀⠀⠀⠀⠀⠀⠀⠀⠀⠀⠀⠀⠀⠀⠀⠀⠀⠀⠀⠀⠀⠀⠀⠀⠀⠀⠀⠀⠀⠀⠀⠀⠀⠀⠀⠀⠀
⠀⠀⠀⠀⠀⠀⠀⠀⠀⠈⠉⠙⠒⠀⠀⠀⠀⠀⠀⠀⠀⠀⠀⠀⠀⠀⠀⠀⠀⠀⠀⠤⠤⠶⠶⠶⠦⠤⠤⠤⠤⠤⢤⣤⣀⣀⣀⣀⣀⣀⠀⠀⠀⠀⠀⠀⠀⠀
⠀⠀⠀⠀⢀⠄⢂⣠⣭⣭⣕⠄⠀⠀⠀⠀⠀⠀⠀⠀⠀⠀⠀⠀⠀⠀⠀⠀⠀⠀⠀⠀⠀⠤⠀⠀⠀⠤⠀⡀⠀⠀⠀⠀⠀⠀⠀⠀⠀⠉⠉⠉⠉⠉⠉⠉⠉⠉
⠀⠀⢀⠜⣳⣾⡿⠛⣿⣿⣿⣦⡠⠀⠀⠀⠀⠀⠀⠀⠀⠀⠀⠀⠀⠀⠀⠀⠀⠀⠀⠠⣤⣤⣤⣤⣤⣤⣤⣤⣤⣍⣀⣦⠦⠄⣀⠀⡀⠀⠀⠀⠀⠀⠀⠀⠀⠀
⠀⠠⣄⣽⣿⠋⠀⡰⢿⣿⣿⣿⣿⣦⠀⠀⠀⠀⠀⠀⠀⠀⠀⠀⠀⠀⠀⠀⠀⠀⠀⠀⣼⣿⡿⠛⠛⡿⠿⣿⣿⣿⣿⣿⣿⣷⣶⣿⣁⣂⣤⡄⠀⠀⠀⠀⠀⠀
⢳⣶⣼⣿⠃⠀⢀⠧⠤⢜⣿⣿⣿⣿⣷⠀⠀⠀⠀⠀⠀⠀⠀⠀⠀⠀⠀⠀⠀⠀⢠⣾⠟⠁⠀⠀⠀⡇⠀⣀⡈⣿⣿⣿⣿⣿⣿⣿⣿⣿⣧⡀⠁⠐⠀⣀⠀
⠀⠙⠻⣿⠀⠀⠀⠀⠀⠀⢹⣿⣿⡝⢿⡄⠀⠀⠀⠀⠀⠀⠀⠀⠀⠀⠀⠀⠀⢰⡿⠋⠀⠀⠀⠀⠠⠃⠁⠀⠀⠙⢿⣿⣿⣿⣿⣿⣿⣿⣿⣿⣶⣿⡿⠋⠀⠀
⠀⠀⠀⠙⡄⠀⠀⠀⠀⠀⢸⣿⣿⡃⢼⠁⠀⠀⠀⠀⠀⠀⠀⠀⠀⠀⠀⠀⠀⠘⠁⠀⠀⠀⠀⠀⠀⠀⠀⠀⠀⠀⠘⣿⣿⣿⣿⡏⠉⠉⠻⣿⡿⠋⠀⠀⠀⠀
⠀⠀⠀⠀⢰⠀⠀⠰⡒⠊⠻⠿⠋⠐⡼⠀⠀⠀⠀⠀⠀⠀⠀⠀⠀⠀⠀⠀⠀⠀⠀⠀⠀⠀⠀⠀⠀⠀⠀⠀⠀⠀⢠⣿⣿⣿⣿⠀⠀⠀⠀⣿⠇⠀⠀⠀⠀⠀
⠀⠀⠀⠀⠸⣇⡀⠀⠑⢄⠀⠀⠀⡠⠃⠀⠀⠀⠀⠀⠀⠀⠀⠀⠀⠀⠀⠀⠀⠀⠀⠀⠀⠀⠀⠀⠀⢖⠠⠤⠤⠔⠙⠻⠿⠋⠱⡑⢄⠀⢠⠟⠀⠀⠀⠀⠀⠀
⠀⠀⠀⠀⠀⠀⠈⠉⠒⠒⠻⠶⠛⠀⠀⠀⠀⠀⠀⠀⠀⠀⠀⠀⠀⠀⠀⠀⠀⠀⠀⠀⠀⠀⠀⠀⠀⠘⡄⠀⠀⠀⠀⠀⠀⠀⠀⠡⢀⡵⠃⠀⠀⠀⠀⠀⠀⠀
⠀⠀⠀⠀⠀⠀⠀⠀⠀⠀⠀⠀⠀⠀⠀⠀⠀⠀⠀⠀⠀⠀⠀⠀⠀⠀⠀⠀⠀⠀⠀⠀⠀⠀⠀⠀⠀⠀⠘⠦⣀⠀⠀⠀⠀⠀⢀⣤⡟⠉⠀⠀⠀⠀⠀⠀⠀⠀
⠀⠀⠀⠀⠀⠀⠀⠀⠀⠀⠀⠀⠀⠀⠀⠀⠀⠀⠀⠀⠀⠀⠀⠀⠀⠀⠀⠀⠀⠀⠀⠀⠀⠀⠀⠉⠉⠉⠉⠉⠙⠛⠓⠒⠲⠿⢍⡀⠀⠀⠀⠀⠀⠀⠀⠀⠀⠀
Summary
After doing some research, going over my ideas and plans, and giving myself some time to think I decided to do some experimentation with different forms of art. This can be to understand forms and shapes of the things I want to model, the different ways to implementing colour and texture, or simply just to explore with different mediums to see how I could potentially learn from it and then let it inspire my final piece.
I mainly experimented with painting using acrylics and gouache, sewing and different fabrics, constructing things out of cardboard, modelling with plasticine, and using various other materials in order to help me figure out what I would like to do for my final piece, and how they can impact my project even if I didn't use them in the end.
Cardboard Wings
Planning
This idea came to me randomly when I was sitting and thinking about what to do next because I was quite stuck. After my research I was burnt out and not really motivated, but this set me back up for being excited about my project! I thought about what materials are readily accessible and easy to work with: cardboard. I decided to make angel wings because I needed to practice with how wings are formed, I tried to paint some but it failed badly because I didn't understand the form and composition of them.


Because of this, I then decided to draw some wings from references I saw trying to keep in mind the structure of how I would build them using shapes cut from cardboard.


In the end, I decided to use the design on the right. This is because it looked the easiest to do but also had the most impressive design. I also just preferred it because of the shape, it looks a lot more elegant than the first 3 designs which just look bird-like, whilst the last one isn't something you would see on a flying creature on Earth.
There are 4 types of feathers: the long ones are on the top and bottom forming the shape of the wing, shorter ones are filled for the spaces in between, then the 2 smallest ones covering the inner edges giving it more of a fluffy look. I will also try to create some sort of bone to cover these smaller feathers for structure.
I stood against the wall whilst someone copied down the general shape of the wings next to me to see the scale that I wanted it to be like which ended up looking something like this ->
I touched up a few parts to make it the shape I wanted it to be. After this, I had someone help with holding a long sheet of paper so I could trace this shape to help me figure out a general layout for the feathers and support pieces.
This was helpful because if I did it on the table I could've majorly miscalculated and made the wings either too big or too small, so I'm glad I took this approach instead.

Constructing
The first thing I did was create the supports for the wings.
To make these, I placed a roll of paper onto the
whiteboard and traced the shape. The supports were just
long strips of cardboard that I cut out and placed in an
arrangement that made sense, by having more support
on the top and less at the bottom. If there wasn't even
support for the top, it would slouch and possibly even
break due to the weight of it, so I had to make sure I did
this properly.
Based on the plans I had made in my sketchbook, I made
4 different templates for the feathers in various shapes
and sizes. This would give my wings more dimension and
variation, making it look more interesting than it would
be if it were all the same shape and size.
Cutting these pieces out took quite a while, the cardboard I was using was thick so I rotated between using a box cutter and scissors. The scissors were easier and quicker to use, however going around corners was difficult and sometimes I couldn't properly fit my hands through the gaps to carry on cutting. There were a lot of feathers to cut out, around 30 feathers per wing.
Over 5 hours, I managed to finish most of the feathers and stick them on using hot glue. I tried my best to follow the sketch that I had made, and although it isn't very accurate, I am still quite proud with how the shape turned out. The feathers are defined, and the overall shape of the wings look good. The next problem I had to tackle was how I was going to make them wearable. At first, I thought that I might make each wing separate, but this was quickly scrapped as it was pretty much impossible to do due to the weight. My final choice looks bulky, but it was the only thing I could do by using cardboard. I made a large panel that was the width of how far apart I wanted the wings to be, and then attached the wings to this by reinforcing with a lot of cardboard in the places that needed more support, mainly where the wings and back panel met.


After Day 1
Added Back Support
Of course to make them wearable, I needed some type of straps to be able to wear them on the shoulders, kind of like a backpack. First I made them using cardboard, which was sturdy at first, however had many issues. When I first tried them on, they fit fine and did their job, but they were really difficult to put on and I was scared of breaking the wings themselves. I then had a classmate try them on and they immediately broke. This made me a bit upset, but also helped me realise that maybe making the straps out of cardboard was a bad idea. I wanted them to be easy to take on and off.
I wasn't too keen on the idea of spending money for the project, but I had done so much work on the wings that I felt like I had to. I decided to buy some elastic and make the straps out of this instead. It's sturdy, flexible, and practically impossible to break. This is due to the fact of how I placed them. I made 4 small holes, 2 on each side of the back panels, close together but not so much that it would be difficult to put on. After threading through the elastic strips, I tied them into knots big enough that they couldn't be pulled out of the holes. I tested this out a few times by letting other classmates try them on and bouncing them around by holding the straps. This also made sure that they fit on different body types, not just mine, which is a bonus for me as I wanted to see my work on other people.
As for the colour, I wasn't going to leave them in the colours of the cardboard I had used. At first, I painted one side in white but after one coat I realised it would take way too long. Instead, I glued on pieces of paper on each feather and cut them around so they fit perfectly. This was difficult to do in some places so there are some gaps here and there, but the majority looks fine. If I knew the paint wouldn't work out, I definitely would've done this to each feather before gluing them down into wings as it would've been easier and would look much cleaner. For dimension, I went in with some watercolours in shades of grey and blue, smearing it around with my fingers to give unique texture and blending. I don't usually use watercolour, so this was nice to experiment with.
I haven't used cardboard to construct anything since secondary school, so it was nice to come back and try it again. It was fairly easy and fun to do, but quite tiring on my hands as you need some strength to be able to cut out so many pieces. I am very proud of how it turned out. I went through some difficulties, but overall the process was quite smooth. This will definitely be helpful for modelling wings as I now understand the general structure of how they look and are arranged instead of having to guess and rush later on. I will also be able to show these off in the end of year show.

Plasticine Wolf


Basic Shapes
Adding Definition
Ears & More Detail
Creating Fur
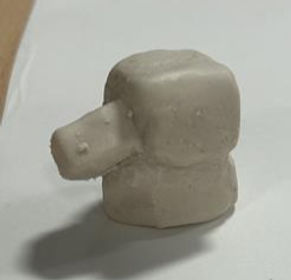
I made this on a whim, I didn't plan to do it but I think it would be really helpful if I do end up going down the 3D route. Before this project, I never focused my work around animals or included them in any of projects in the past. I knew I had to learn the structure and basic anatomy of a wolf in order to understand it more, so I went for another medium that I haven't used in a while which is plasticine. Although much tougher than clay, plasticine never dries which makes it easier to work with in my opinion. It is also easier to hold and mould it in your hand without the rest of it changing shape.
I started with basic shapes, 2 cubes and a cuboid to create the general shape. It is important that I look at things as basic shapes instead of the whole picture to truly understand what I am doing. Afterwards, I started carving in some definition to start making it look like a wolf. This included shaping the nose, mouth and eyes. I was consistently looking at some reference images during this process to get as accurate as possible without it looking too realistic as I knew I wouldn't go down the realistic route. Following this I made the ears and the fur to finish it off. Looking at it, the nose seems too thick and the ears are placed weirdly. This is a good thing however because now I know what I should avoid when creating wolves again, and what to focus on. This will definitely help with my project in creating wolves and has helped to gather my understanding in a wolf's anatomy.
Final Model


Painting


Gouache
Gouache
Acrylic
I haven't done any painting since my last FMP around a year ago so I wanted to pick it back up and see how I was. I was sort of just putting ideas down on paper and painting over them to experiment with colours, designs, and compositions. I didn't finish any of them (as you can see), this is partially due to how long it would take but also because I didn't really like how anything was turning out. I didn't really think I would do painting for my final piece but I wanted to confirm it just in case I changed my mind. I have become a lot more confident with my 3D skills and have strayed away from traditional methods of drawing. I am a bit disappointed that I lost some passion and skill for painting as this was one of the mediums I was really confident in, but I saw this coming when I started practicing more in digital arts.
When using gouache, some colours are thinner and act more like watercolours, whilst others are thicker and apply like acrylic. This frustrated me because I wanted all the colours to be even in application, this is partially my fault as I didn't let my gouache palette rehydrate properly. I also didn't plan any of these paintings out properly so I was a bit stressed out trying to figure it out as I went along.
For the acrylic painting, I was fairly happy with how it was turning out but I realised I was behind on my plans that I made at the start so I left it as it is and will probably finish it after FMP for the end of year show. It depicts a seraphim/throne-inspired angel in a strange place. Because of how heaven is depicted to have colours we have never seen before I thought including strange shapes and patterns with various colours would look quite cool, even if it isn't a depiction of heaven itself. This piece is heavily inspired by Neon Genesis Evangelion, and I really hope to finish it at some point.
Cosplay Making
Although this was a personal project it will help in many aspects of my final piece so I have decided to talk about it and go through my process. It links into the idea of afterlife as the character is themed around ghosts. The character I have made is Perona from the series One Piece.
Before I start things off, I had to make a plan and go through each detail and item of clothing from the character to make sure I understood how to make it, and what materials I needed. For most of these, I didn't make them according to plan. However, I still think it is important to include these to show that as I go along I made changes to fit within a budget, but also to make the cosplay look as accurate to the character as possible.


Wig
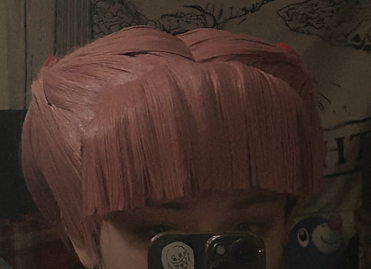
To start, I made the wig which was probably the most time consuming part of the costume at around 20 hours. This was the first time that I had made a "helmet" wig which refers to a wig that is made to fit someone's head exactly and is fairly hard in both difficulty and touch due to the amount of glue and batting used, usually made for wigs that have ponytails. I ended up having to use 2 wigs for this, 1 for the head itself and another for the pigtails.
To make the base of the wig I crimped and cut off the hair in bundles for easier use. By crimping the wig, the synthetic hair is less shiny, much easier to style and stick to glue because of its texture. It hurts my hands a lot because I used a really small crimper, but also worth it. After this, I used hot glue to lay down the hair left on the wig cap, and then glued on batting trying to keep the shape of the head and not have any weird bumps on it. Some people use a heat gun to lay down the batting even further but I didn't have access to one so this had to do, although it is harder to deal with because it is so puffed up.
Making the base of the wig was difficult, there is a lot of work that had to be put into it: decided how large wefts are, where the bangs start, how the hairline will look. Making wefts for the head is tiring because they need to be thin enough for all the hairs to have glue on them, but thick enough to keep its shape and cover the batting properly. In the end I did still have gaps in some places but it wasn't extremely obvious so I left it as it is. For the bangs, I glue on another thin strip of batting to make them fuller without using a lot of hair as I was worried that if I used just hair to build it up, it would end up falling off.
The pigtails themselves were easy to make, I ripped out the wefts already in the wig so that I wouldn't have to glue them myself which make things a lot easier. To attach them to the wig I had stuck the tops of some bottles which makes attaching and detaching a lot easier. I stuck these wefts in circular motions on the bottle caps until I got the thickness I needed. The top layer used wefts I had made myself so that the fabric wasn't visible, gluing them around almost like a hairband. As her hair is slightly curled, I used a hair straightener and a roll of wrapping paper to get big, loose curls that stayed in place.


Shirt & Cape
For the shirt I used an old long sleeve top that I had lying around. I hemmed this to be cropped like hers, and also made it tighter around the waist and chest to fit me better. For the design on the front, I made some stencils, drew around them in pencil, and them filled this in using black fabric pens. I did want to use fabric paint as this would've been easier and give better results in terms of coverage, but I couldn't find any in the shop.
On the sleeves she has 3 layers of red lace, the top 2 being thin, and the bottom one being thick. I got a roll of red lace and used 3 layers of them for the bottom, and one layer of each of the other 2. This was quite hard to sew on as the arm holes are small. Every few stitches I had to move around the fabric which was frustrating, but I managed to get it all done without any mistakes! I feel like I cheated a little with the shirt being already made as I did with the tights, but I was trying to save money so this was the best I could do.
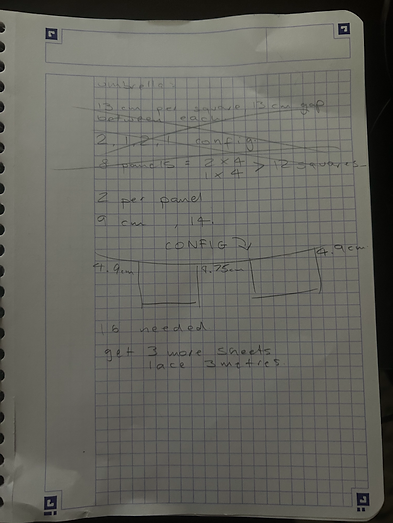
The cape consists of 3 parts: the cape base, the fur, and the bow. For the cape base I used pictures of a cape sewing pattern as references and drew them onto wrapping paper as that is similar to pattern paper. I then sewed this together along with some scallops I had made previously for the neck area. The fur was quite annoying to do as I couldn't figure out how to properly place it. I wanted the border between the 2 fabrics to be seamless, but this kept causing the cape to flip into itself instead of rest nicely on my arms. To fix this issue, I cut into the area where the fabric curves, this left a huge gap though which I had to glue on some more fur. I could only use this method with fur as I could brush it to hide the rough lines where the 2 connect, it is still a bit obvious but this was the best I could do.
For the bow, I made 4 rectangles of various sizes that were 2 layers on fabric sewn on top of each other and arranged them to make a bow. I was going to fill the inside of the bow with batting but this would interfere with how to falls on the body so I left it as it is. To easily make the bow attachable I added Velcro straps to the fur and bow.


Skirt & Belt
The skirt was made using a simple 1/4 circle skirt measurement according to my body, I did make a prototype before this to make sure the pattern actually worked. After marking everything down I layered the material in half so that the skirt would be double layered for the scallops that I had to make. After making some measurements and referencing how many scallops she has on her skirt, I drew these too and then sewed everything down, leaving a gap for a zipper which is sewed in later on. The scallops can be quite annoying since you have to cut down the edges short enough so the shape stays, but long enough that the stitches wouldn't break. Then I hemmed the top of the skirt. After trying it on I realised that it is a little short, but I will be wearing shorts under this anyway so it didn't matter too much and it was in the exact proportions of the character. Using iron-on vinyl, I cut out shapes of the flowers and border, and then ironed it onto the skirt in the correct order. I also created some belt loops to sew onto the skirt, however I lost one of them so I ended up sewing on just 3 instead.
For the belt I used EVA foam. I started with a large strip based on my hip measurements and painted it black. Then, cutting out much thinner strips and painting them gold. I also made the circles that are on her belt out of hot glue so that I could paint them the same gold colour whilst knowing the exact size that I needed. After placing these it was time to make the belt buckle. The belt buckle was made using 2 layers on EVA foam in a heart shape; a thin larger one, and a thick smaller one. I also painted small stick-on pearls which I glued on with super glue. This took a while because they're so small, but I like the way it turned out. I was going to make the attachment to close the belt with Velcro, but it wouldn't hold properly so I have to use hot glue to close it when I wear the belt.


Shoes
There isn't much to say about the shoes, I wanted to get red wellies but they are insanely expensive for some reason. Instead I bought black boots that had a similar shape to hers and painted them red. This took around 6 coats to cover the black properly. I then made some belts out of EVA foam, painted them, and stuck them on. This process was simple, but if I paint shoes again I will make sure to mix the paint with fabric softener to make it more elastic, and so the paint doesn't crack.


Head Accessories
There were 2 hair accessories that I had to make, the crown and the hair ties. The hair ties were much simpler. All I had to do was make 2 flower templates, and trace them onto 2 different colours of thin EVA foam; 4 black and 2 white. Whilst the parts were still separate I cut holes the size of the bottle cap to make sure they fit properly and weren't too loose.
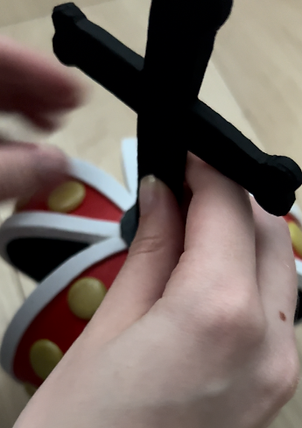
The crown was more complex to make. I made a base band to know around what size the crown should be. It is quite large in proportion to her head so I had to keep this in mind. I then created 5 more bands to connect to a circle at the top and decorated it with smaller strips and more hot glue circles. When I put everything together I was a bit unhappy with the shape as it looked too circular rather than like a royal crown. To fix this, I removed the strips from the circle at the top and this time instead of gluing the strips to the edges, I glued them to the top. This fixed the shape. I then created a cross out of more EVA foam and glued this to the top. To make sure it stays attached to the wig, I used hot glue and glued it onto the wig top in the place it needed to be. I was going to use wire but because of the way I glued the batting, the wires wouldn't go through.


Umbrella
I left the umbrella for last as it wasn't that important for the cosplay but was still necessary for her character and she is carrying it around really often. For this, I used a white umbrella. I painted the outer layer red, and the inner layer purple just like her umbrella. It required around 2 coats each to make sure the other colour didn't show when looking at just 1. To make the panels I was going to use EVA foam squares, but decided to cut into the umbrella itself. I had to snap off some of the metal framing to make sure that the panels flow like the rest of them. I got a bit frustrated with this because the fabric kept pulling back but I managed to fix it by stretching it down. I use baking paper and a straightener to make sure the panels were straight as possible.
The eyes and the horns were made using EVA foam again, and I just stuck them on with super glue. For the handle I used air dry clay which is lightweight and doesn't crack when it dries which made it perfect for the handle. It didn't end up very smooth, but this is the best I could achieve. I then painted this with acrylic and sealed it with acrylic sealant.


Final Cosplay

Even though this was a side project, I believe it will highly inspire how I design my character for my final piece, taking into account colours and sewing practices, whilst making sure the fabrics lay properly on the body and making sure the way the clothing is actually makes sense. It also drilled into me the idea that even though a design looks simple, it can be hard to make and look extremely unique. Because of this, I will try to keep my character designs simple yet unique but taking advantage of silhouettes, shapes, and colour palettes. My understanding in character design has developed further due to this, as well as other traditional techniques that I may use in the future.